

This software project demo is for tech people,
evaluating low cost software frameworks that feature flexible, secure
data interface solutions.
Are your data interface, system integration requirements
like these descriptions?
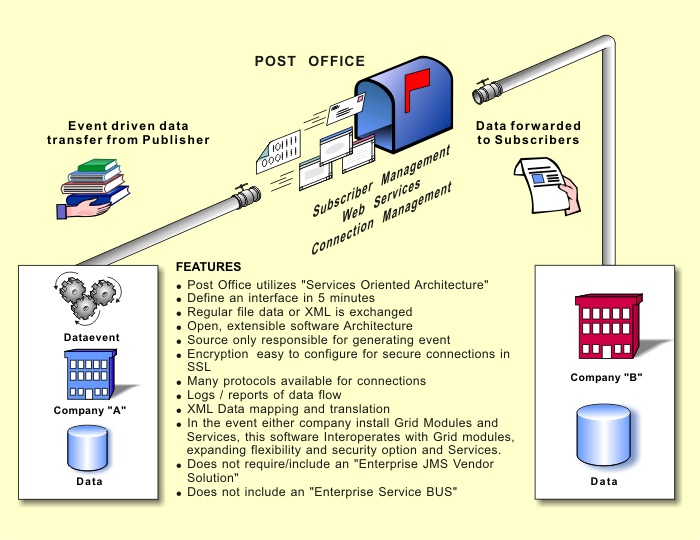
Do you need a better infrastructure for exchanging business data between
hard-to-connect systems?
Would you find value in a framework featuring a virtual
Post Office, with additional
tools to build ON Demand B2B data interchanges using the Internet as the hiway?
The following demo walks you thru steps to build a new data interface of your own and to transfer data across the new interface. There are a number of demo scenarios of varying complexity covering single and multi-file situations. Use the following checklist to run thru the demos:
If you have troubles completing the list, or if you need additional help and background you can fill in lots of details with these links:
By going to the URL for download
and scrolling the page until you see the portion like this
view with the table of
"Latest File Releases" you will find the correct package
"b2bpo" and the correct Version "b2b client 1.2" to download.
In the Download Column of the table, get the
file named appropriately for your OS. Linux, and unix users need to get
b2bpoclient-1.2.tar.gz. If you are using Windows,
you need to get b2bpoclient-1.2.zip.
This file should be named so that it collaborates with Standard Software for "UNZIP" or
"UNTAR" processing with an archive file for input.
Go to the Parent Directory and unpack the archive. This creates
the "po_1_2" directory as a child of the parent.
The (following example uses /e/
on a Linux system for the parent directory). After
Contents of /e/po_1_2 after the archive is unpacked:
r@robert1 /e/po_1_2
$ find

./bin
./bin/b2bpo
./bin/b2bpo.bat
./data
./data/outbnd
./data/outbnd/readme.txt
./data/outbnd/tm1102a.txt
./data/outbnd/tm1128.txt
./lib
./lib/poclient-1.2.jar
./lib/repository
./lib/repository/axis.jar
./lib/repository/commons-discovery.jar
./lib/repository/commons-logging.jar
./lib/repository/dom.jar
./lib/repository/j2ee.jar
./lib/repository/jax-qname.jar
./lib/repository/jaxp-api.jar
./lib/repository/jaxrpc.jar
./lib/repository/log4j-1.2.8.jar
./lib/repository/mail.jar
./lib/repository/namespace.jar
./lib/repository/saaj.jar
./lib/repository/sax.jar
./lib/repository/wsdl4j.jar
./lib/repository/xalan.jar
./lib/repository/xercesImpl.jar
./logs
./readme.txt
Note that the file poclient-1.2.jar in the lib
directory is an "executable" JAR file and is the target of any of the Demo Sample
shells that CALL the software.
Some of the setups for the demos submit to URL's that require authentication ( users, passwords ) On any challenge when you are trying to access a Web-Form, use the following for credentials:
  java -version

  java version "1.4.2-beta"
  Java(TM) 2 Runtime Environment, Standard Edition (build 1.4.2-beta-b19)
  Java HotSpot(TM) Client VM (build 1.4.2-beta-b19, mixed mode)
  "%JAVA_HOME%\bin\java" -version
  java version "1.4.2-beta"
  Java(TM) 2 Runtime Environment, Standard Edition (build 1.4.2-beta-b19)
  Java HotSpot(TM) Client VM (build 1.4.2-beta-b19, mixed mode)
Examples above show how the
-version option along with a run java command verifies
the Java version is installed on your PC. There are 2 separate syntax samples
where the one to use depends on whether your PC has a Path environment that includes java.
The 2nd syntax is used when your Path does not include a specific java version.
Get a command shell on Windows using the Windows start button
and the run option to enter "cmd.exe".
This will launch a command line shell into which you can enter the appropriate
java -version expression in the
example above.
If the java version on your PC is notJava 1.4 or above,
you will need to:
Java Servlet Container topicsJava Web Start (JWS)
Demos where you utilize a thin Client to manage all of the Client Side applications. In the event you will
use only JWS clients and will not run Client Side Java Applications at a command line, the instruction
below for JAVA_HOME is NOT required. You only have to follow the JDK install instructions from SUN.
Follow instructions on downloading and then installing the Java software.
You do not need to have the entire J2SDK. Rather, you can use the link for
Java 2 Runtime Environment.
Once you have completed the install, you also need to
change the JAVA_HOME environment variable to
match the directory where you just installed the new java version. If your PC already
had Java 1.4 and you have not set JAVA_HOME, you will need to set it.
Also, you may use Windows help and search on Setting Environment Variables if you are not
familiar with setting Environment.
The Post Office portion of the demo applications is Web Service that should be verified before attempting to run the demos. If you go the base URL for the PostOffice attachments and do not get a response saying "This is an axis service", you should not attempt the demos...
WSDL for the back-end services used by the Demos is
here.
The WSDL contains 2 operations labeled postFile that reference
a couple of back end Post Office methods that have been exposed as Web Services over JAX-RPC
and SOAP with Attachments.
WebEX is slick for this sort of thing, but its also expensive.
Allow us to demo some of our open source applications without unreasonable expense, by considering
a simple software install on your machine that will run WebEX style meetings.
Go to the download and
scroll down to Latest File Releases. Download
version 1.3dev4. If you have windows, download the
setup.exe file from the list of possible download files presented.
Run the setup.exe that you downloaded, accepting the defaults for the install (
note that you probably do NOT want to register the Server as a system Service - a choice that is not an
issue if you are working with the install default conditions) .
Both Client and Server are installed under the default condition,
although only the TightVNCViewer is required for the conferencing.
For the actual conference, you will be sent a server address and a password in your email.
Start the Client and Connect to the Conference via the
STart Programs , TightVNC , "TightVNC Viewer". A
Connection Dialog will popup asking for the server address.
Enter the address that you were provided and clik on the "Connect" button. Supply the password
and you're desktop should now show the virtual desktop image that is the presentation of B2BPO's
software. When the meeting concludes, the red "X" on the menu-bar is for disconnecting from the meeting.
As a small favor to the presenters, when the Connect Dialog comes up, you may use the "Options"
button to make the following
property changes: